The Home Assistant Layout Card customizes the display of entities in the UI. It organizes devices and automation for optimal control and accessibility.
Home Assistant takes your smart home to the next level by offering a central hub for all your connected devices. With a user-friendly interface, Home Assistant’s Layout Card is a significant feature that enhances interaction and customization. This powerful tool allows you to arrange your automation, sensors, lights, and more into a neat, well-organized dashboard, facilitating quick access and management.
The layout card is designed for both newcomers and seasoned tech enthusiasts, ensuring that controlling your smart home environment is both intuitive and efficient. It not only improves the aesthetic appeal of your dashboard but also streamlines your interaction with your smart home, making it simpler to monitor and adjust your devices as needed.

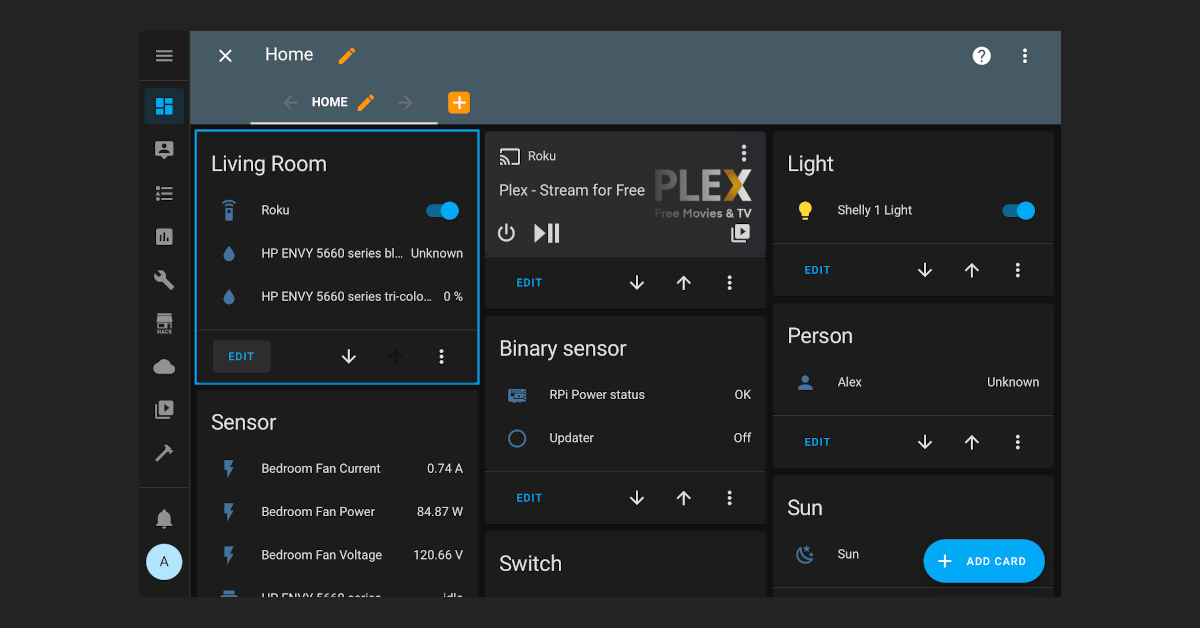
Credit: community.home-assistant.io
Introduction To Home Assistant
Home Assistant transforms any house into a smart home. This powerful tool gives you control over your home appliances, lights, and security systems. The magic lies in its ability to connect different devices for a seamless experience. Dive deep into Home Assistant and discover how it can make life smarter and more efficient.
The Evolution Of User Interfaces
User interfaces have come a long way. We’ve shifted from clunky buttons to sleek touchscreens. Now, with Home Assistant, intuitive control takes center stage. You tap, swipe, and speak to manage your home. It’s a blend of style and technology, always learning and adapting to fit your lifestyle.
Importance Of Customization
A home is deeply personal. So should be your control over it. Customization in Home Assistant means setting scenes for when you wake up or preparing your house for your arrival. It allows your space to reflect your needs and preferences, making every interaction unique and tailored specifically to you.
Here’s why customization stands out:
- Personality: Your home feels like an extension of you.
- Efficiency: Automation saves time and energy.
- Control: Manage devices your way, on your terms.

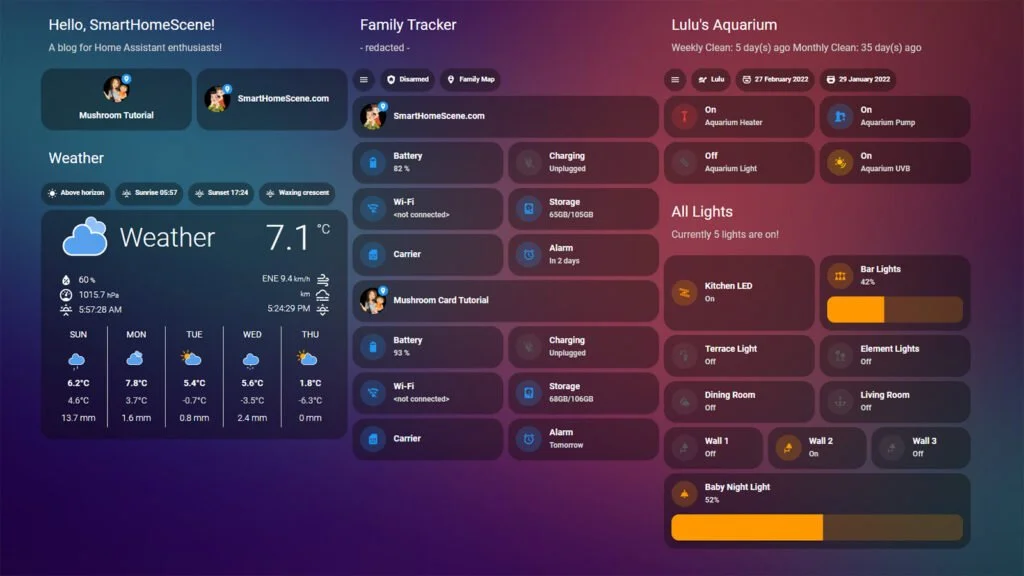
Credit: smarthomescene.com
Home Assistant Layout Card Basics
Understanding the Layout Card is key to creating a personalized and efficient dashboard within Home Assistant. With the ability to organize your devices and scenes neatly, the Layout Card is a tool that enhances the user interface, offering a streamlined experience. Let’s dive into what makes the Layout Card a must-have for any Home Assistant user.
What is a Layout Card?
What Is A Layout Card?
The Layout Card acts as an organizational framework. It allows users to place entities, like lights and sensors, in specific arrangements on the Home Assistant dashboard. By controlling the layout, users can design their interface to reflect the flow of their smart home. This card simplifies navigation and control, empowering users to access their devices quickly and efficiently.
Key Features And Capabilities
- Customizable Grids: Arrange cards in rows and columns to fit personal preferences.
- Responsive Design: Layout adapts to different screen sizes, ensuring a consistent experience across devices.
- Drag-and-Drop Interface: Easy positioning of cards within the grid by dragging them into place.
- Multiple Layout Types: Choose from vertical, horizontal, stack, or custom layouts for ultimate control.
- Conditional Visibility: Show or hide cards based on entity states for dynamic interfaces.
The Layout Card blends flexibility with functionality, creating a powerful tool for customizing Home Assistant dashboards.
Setting Up Your First Layout Card
Welcome to the world of smart home customization with Home Assistant! Once you’ve familiarized yourself with the basics, setting up your first Layout Card is a great next step. This guide will take you through the essentials and the process of implementing your first card, ensuring a seamless and tailored experience with your Home Assistant dashboard.
Prerequisites For Customization
Before diving into customizing your Home Assistant interface, make sure you have:
- Home Assistant installed on a compatible device.
- Access to the Home Assistant front end where cards can be managed.
- HACS (Home Assistant Community Store) is set up for custom plugins and cards.
- Basic knowledge of YAML to configure cards.
Step-by-step Implementation
- Start by ensuring HACS is correctly installed and authorized in your Home Assistant setup.
- Via the Home Assistant front end, go to the HACS section and search for the Layout Card plugin.
- Install the Layout Card plugin and wait for the success confirmation.
- Navigate to Lovelace Dashboards under your Home Assistant configuration.
- Choose a dashboard, or create a new one, and click on ‘Edit’ to manage cards.
- Press the ‘+’ button to add a new card and select ‘Manual’ to input custom YAML.
- In the YAML configuration box, define the layout type and card entities.
- Preview your Layout Card by clicking on the ‘Show Preview’ option.
- If satisfied, click ‘Save’ to apply changes to your dashboard.
With these steps, you should now see your custom layout card bringing a new level of control and aesthetics to your Home Assistant experience. Enjoy shaping your smart home to fit your unique style and preferences!
Advanced Layout Card Techniques
Advanced Layout Card Techniques transform the way Home Assistant users design their dashboards. These methods offer a personalized touch and elevate the usability of the interface. Let’s explore how to create dynamic, functional layouts that adapt to various devices and conditions.
Creating Responsive Grids
Responsive grids are essential for a harmonious display on all devices. The layout card’s flexibility allows for crafting grids that adapt seamlessly from desktops to smartphones.
To establish a responsive grid:
- Define columns with
grid-template-columns. - Set
grid-gapto maintain consistent space between items. - Utilize
media queriesto adjust for different screens.
A simple code example displays a two-column layout for screens wider than 768px:
Adjust the numbers inside repeat() for more columns on larger screens.
Utilizing Conditional Visibility
Conditional visibility makes your dashboard dynamic. It shows or hides elements based on certain conditions such as user presence, device states, or time of day.
Implement conditional visibility with these steps:
- Create conditions within
conditionsthe array. - Set
cardto the content shown when conditions are met. - Use
type: conditionalto start a conditional card.
Here’s how to hide a card unless it’s the weekend:
<type: "conditional"="">

<entity: "sensor.date"="">
<state: "saturday,="" sunday"="">


<type: "your="" card"="" desired="">
 "Your content here">
The sensor.date checks the current day and displays the content accordingly.
Tips And Tricks For A Polished Ui
Welcome to our detailed exploration of the Home Assistant Layout Card. Crafting a sleek and intuitive user interface (UI) can enhance your smart home experience. Let’s dive into some tips and tricks to create a polished UI for your Home Assistant setup.
Optimizing Space And Functionality
Maximizing the use of space while retaining functionality is key.
- Group related entities to reduce clutter.
- Use
gridandstackcards to organize devices effectively. - Hide unnecessary entities to keep interfaces clean.
Implementing conditional cards ensure that space is used smartly. Only show devices when they’re in use.
| Component | Purpose |
|---|---|
vertical-stack |
Stacks cards in a column |
horizontal-stack |
Lines up cards side by side |
Aesthetic Enhancements
Visual appeal is necessary for an enjoyable interface.
- Choose themes that complement your home’s style.
- Customize icons and colors for a consistent look.
- Employ
custom:button-cardfor personalized control buttons.
Animations can bring life to your UI, but use them judiciously. Too much motion can be distracting.
Common Challenges And Solutions
Using the Home Assistant Layout Card can help personalize your smart home interface. Yet, some users face common hurdles. Here, discover easy fixes for typical issues and benefit from available support networks.
Troubleshooting Common Issues
Stumped by an uncooperative layout card? Let’s iron out those wrinkles. Follow these steps to tackle common snags:
- Check for updates – Ensure your Home Assistant and Layout Card are updated.
- Configuration validation – Verify there are no errors in your YAML configurations.
- Browser cache clear – Sometimes, a simple cache clear fixes display issues.
- Community forums – Seek advice from other users who experienced the same.
If these steps don’t solve the problem, here’s more help:
| Issue | Solution |
|---|---|
| Entities Not Aligning | Adjust the layout properties within the card settings. |
| Missing Entities | Confirm entity IDs and include them correctly in configurations. |
| Unresponsive Interfaces | Examine the browser compatibility and switch if required. |
Community Resources And Support
Stuck after troubleshooting? Seek support from Home Assistant communities:
- Visit the Home Assistant Community Forum for discussions and solutions.
- Explore the Home Assistant Discord Channel for real-time help.
- Browse GitHub issues for documented challenges and fixes.
- Lean on the extensive Home Assistant Documentation for guidance.
Remember to share your resolved issues – your experience could be a lifeline for someone else!

Credit: smarthomehobby.com
Frequently Asked Questions Of Home Assistant Layout Card
What Is A Home Assistant Layout Card?
A Home Assistant Layout Card is a custom card for Home Assistant’s Lovelace UI. It allows users to organize entities in a customizable grid, enabling a tailored dashboard for smart home controls.
How To Install Layout Card In Home Assistant?
To install a Layout Card, you typically use HACS or manually add the files to your `www` folder, then reference it in Lovelace’s `resources` section. Restart Home Assistant to apply changes.
Can You Customize Layout Card Styles?
Yes, Layout Cards are highly customizable. You can adjust the grid style, spacing, and alignment properties via the card’s configuration options to suit your dashboard design preferences.
Do Layout Cards Support Mobile View?
Layout Cards are responsive and support various screen sizes, including mobile devices. They adjust the layout dynamically for optimal viewing and control on smaller screens.
Conclusion
Embracing the Home Assistant Layout Card transforms your smart home interface into a seamless, customized control center. This tool promises both efficiency and personal flair, ensuring users navigate their smart ecosystem with ease. As you dive into tweaking your dashboard, remember that an intuitive setup enhances interaction, making your smart home truly yours.
Ready to refine your space? The Layout Card is your ideal ally.

I am a technology writer and blogger with 17 years of experience in the fields of information technology, artificial intelligence, cyber security, automated systems, and the latest technology trends.

